I’ve received some questions via e-mail about the Lake O’Hara experience generally and about planning a visit to the area specifically. Another inquiry, by quietsolopursuits, in a comment to the Day 8 chronology post, convinced me that it was time to write a piece that discusses the nuts and bolts of such an endeavor–at least, as best as I can describe them based on personal experience and what I’ve been told by others who have spent considerably more time in the Lake O’Hara area than my four days over the past couple of years. (Please understand, I’m not an expert on this subject and don’t pretend to be; there are plenty of people out there who have forgotten more about the Lake O’Hara experience than I’ll ever know, but between my limited personal experience and my ability to relate what I’ve learned from others, I hope that what follows will be of some use to those of you considering a trip to O’Hara.)
So, let’s jump in with both feet.
The Lay of the Land
Let’s start by taking a peek at an overview of the area’s geography.
 (I recommend right-clicking on the map image and opening a much larger version of it in another tab or window so that you can easily follow along with specific directions and notations that will appear in the text below.)
Access to Lake O’Hara from the Trans-Canada highway–regardless of whether you obtain a reservation on the bus or you hike in–comes southbound via the Lake O’Hara Access Road (an unpaved fire road), the last two miles (3.2 km) or so of which you can see emanating from the top-center of the map. (The parking lot for Lake O’Hara is well-marked and lies on a short spur road about halfway between Lake Louise Village, Alberta and Field, British Columbia, on the Trans-Canada Highway.) The full length of the O’Hara access road, from the parking lot is approximately six miles (11 km) and it’s uphill all the way. It’s not a particularly steep uphill climb–remember, it’s navigable, in both directions, by an ordinary school bus–and the “trail” is really a road, but it’s a long trek, particularly if you’re hauling photo (and other) gear–and you should be. Keep in mind that the end of a hike to Lake O’Hara via the access road is simply the beginning of the adventure because the attraction once you reach the lake itself is a series of additional hikes–almost all of which are fairly long and quite arduous. Starting one’s day with a six-mile uphill hike and a full pack is an ambitious undertaking, but not out of the realm of possibility as long as you’re in good physical shape and you get an early start. (Keep in mind that this entire area is of the high elevation variety; Lake O’Hara itself–essentially the low spot of the immediate region–is nearly 7000 feet (2115 m) above sea level; most of the trails access spots considerably higher than that, so if you aren’t used to the “thin air” of these alpine areas, you’ll need to acclimate yourself.)
It’s also worth noting that you don’t have to hike back down to the parking area. You don’t need a reservation to take the outgoing bus from Lake O’Hara (though you do need to have cash to pay for the ride–in 2015, it was $10 CN for a one-way outgoing bus ride).
The bus up to the lake makes two stops. The first is at the entrance to the Lake O’Hara campground. The second, no more than 1/2 mile (0.8 km) further up the road, is the Le Relais Day Shelter. If you’re up on a day pass, this is where you’ll disembark (and, upon return, board) the bus. Le Relais is located just steps away from the northwest shore of Lake O’Hara, as you can see on the linked map. This is the nerve center for the extensive series of hiking trails that permeate the area.
Hiking in the Lake O’Hara Area
There are a number of hikes that you can make and every single one of them provides direct access to absolutely stunning scenery. All but one of the hikes is relatively lengthy and comparatively difficult. The exception is the Lake O’Hara Circuit (Trail #25 on the map), which circles the lake. It’s fairly short (1.7 mi; 2.8 km) and has only minor changes in elevation. The only portion of the trail that’s even moderately difficult is the need to cross a rocky moraine located on the southeastern edge of the lake, but even that part of the route is well-marked and, when dry, nothing more than a tiny inconvenience. I’ve hiked this trail a couple of times (on the same day as I’ve done other, much more difficult hikes) and it’s very easy and provides marvelous views of this beautiful lake and the surrounding forests, streams and peaks from every possible perspective.

Lake O’Hara Canoe Dock, Yoho National Park, British Columbia
There are a series of highline hikes that are accessible in the area, including (but not limited to) Huber Ledges/Winwaxy Gap (#11), Yukness Ledges (#28) and the All Soul’s Alpine Route (#1). I haven’t hiked any of the alpine trails, principally due to lack of time and the amount of gear that I’m carrying. Many of these trails require some degree of scrambling over scree slopes or boulder fields and I just didn’t think that was a great idea given that I’m hauling a pack full of gear and clutching a tripod. These trails are also completely exposed to the elements and they have a tendency to ice up fairly easily. They are, however, absolutely breathtaking, according to all accounts, and if I ever get back to the area (with a much smaller photo kit), I will almost certainly try several of them–I’m particularly smitten by the route to All Soul’s Prospect and its staggering view of Lake O’Hara, thousands of feet below, and the Winwaxy Peaks to the north.
Among the two highlighted trails that I haven’t done–due entirely to lack of time–are those to Lake Oesa (#26) and Lake McArthur (#18 and either #10 or #14). Lake Oesa is the shorter of the two (roughly four miles (6.4 km) round trip, with an elevation gain of nearly 800 feet (240 m) on the incoming route). Lake McArthur is a roughly five-mile (8 km) round trip, with an elevation gain of a bit more than 1000 feet (310 m), depending on the specific route you choose. (There is a lower approach to McArthur and a higher one as well; many hikers choose the lower one for the hike in and the upper trail for the hike out.) As I mentioned earlier, these hikes are demanding–less because of the distance than the elevation change; remember, you’ll be hauling a pack of indeterminate weight and dealing with high elevation conditions and potentially being impacted by inclement weather. I’ve spoken to others at length about both of these hikes and they definitely sound well-worth doing. (Had the weather been cooperative on my third day of access to Lake O’Hara this past fall I was planning on doing the Lake McArthur hike and, time permitting, I would have hit Lake Oesa that day as well.)
There are other, typically lesser followed, trails in the area as well, such as the one to Linda Lake (#13) and Cathedral Lakes (#30), which I know less about. (Go here for Parks Canada’s descriptions of all the O’Hara area trails.)
The Opabin Plateau
The trail I’m most familiar with (I’ve hiked it, in full, three times) and that I unequivocally recommend is the Opabin Plateau Circuit, which can be approached from either the East Opabin Trail or the West Opabin Trail. I received some very good advice before I ever attempted the trail in 2014 from Royce Howland–go up via the East Opabin Trail and down via the West Opabin Trail. After I completed the circuit the first time I understand why he suggested doing it this way and I’ve followed this approach each time, despite the fact that the approach via the West Opabin Trail is a bit shorter. (Virtually all written accounts of the hike that I’ve found describe going up via the West Opabin Trail.) Both trails are very steep, but the west side is notably steeper (and far more exposed).
Opabin Plateau Outlet Stream, Yoho National Park, British Columbia
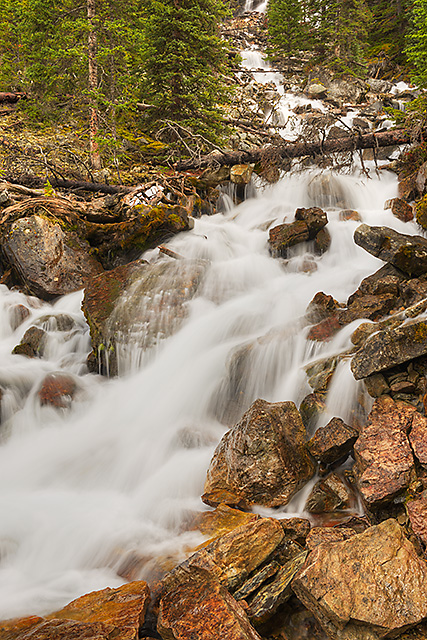
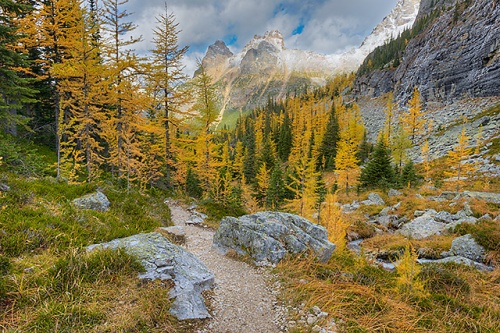
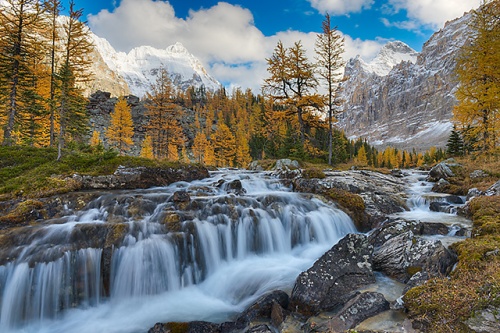
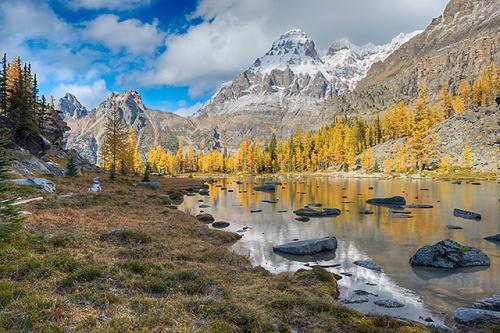
To approach the circuit this way, take the Lake O’Hara Circuit trail from Le Relais (#25) in a clockwise direction around the lake; you will pass access to the Huber Ledges and Lake Oesa trails along the way. You’ll climb over the rocky moraine that I mentioned earlier in this post and reach one of the long waterfalls (see above) that represent the streams that drain the Opabin Plateau into Lake O’Hara. Roughly halfway around the circuit (not quite 1 mile, roughly 1.4 km) you’ll reach the head of the East Opabin Trail (#8). From here, the climb through the conifer forest involves roughly 400 feet (120 m) of elevation gain in less than a kilometer (0.62 miles). Yes, it’s steep. Very steep. There’s more climbing to do up on the plateau, but none of it is anywhere near as lengthy or as steep as this portion of the circuit. The hike up to the base of the plateau–where you’ll have your first encounter with larches–runs, for much of its duration, alongside one of the gushing O’Hara inlet streams, so you’ll have something attractive to look at if you feel the need to stop and catch your breath along the way.
East Opabin Trail, Opabin Plateau, Yoho National Park, British Columbia
When you encounter the first side trail–it will head to your right as you ascend the East Opabin Trail–most of the climb is behind you. That side trail heads in the direction of the Opabin Prospect–a rocky outcropping at the head of the plateau that provides a truly breathtaking view of the Lake O’Hara valley and the mountains beyond, and you can certainly head there if you like. I always push on to the main part of the Opabin Circuit (#31, a.k.a. the Opabin Highline), and leave the prospect until later in the hike.
Moor Lakes Reflections, Opabin Plateau, Yoho National Park, British Columbia
If you stay on the main trail, you’ll soon reach some of the tiny Moor Lakes–shallow, crystal clear ponds with the potential for epic reflections (on no- or low-wind days). Shortly thereafter, you’ll encounter Hungabee Lake–a larger body of water–to your right, and another side trail (the only one shown on the map) that cuts across the plateau and joins the east and west parts of the circuit below the Opabin Highline. It’s worth noting that there are numerous small, interim trails on the plateau that aren’t marked on the map. All of them are well worth exploring, as all lead to different small bodies of water and stands of larch and pine, providing different perspectives of the magnificent scenery that is endemic to the Opabin Plateau.

Hungabee Lake, Opabin Plateau, Yoho National Park, British Columbia
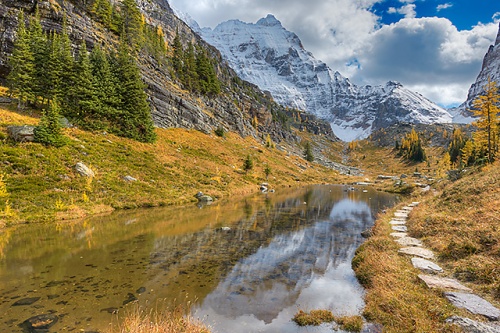
Continuing on the main part of the circuit trail, from the eastern edge of Hungabee Lake, the trail climbs over a boulder field–there are trail markers–and up a slope to the highest point of the plateau (the Opabin Highline), near the edge of Opabin Lake. (A couple of short spur trails will take you right up to the water’s edge.) This highest body of water on the Opabin Plateau sits immediately below Yukness and Hungabee Mountains, Ringrose Peak, Mt. Biddle and Opabin Glacier. This is, essentially, the midpoint of the Opabin Circuit Trail.

Opabin Lake, Opabin Plateau, Yoho National Park, British Columbia
From the trail, as it loops back around to the west, you have some jaw dropping views of the plateau, including Hungabee Lake and some of the smaller Cascade Lakes as you face north. Lake O’Hara isn’t visible from here and won’t be again until you reach the Opabin Prospect or begin the descent from the plateau on the West Opabin Trail. This begins the journey into what is my very favorite part of the Opabin Plateau. Don’t get me wrong–the east side is great, particularly around the Moor Lakes. But the west side opens up access to an area so rich in photographic opportunities that I consistently run out of time before I ever run out of subject matter. In fact, this is the reason why I spent two full days in a row shooting up on the plateau and, both times, had to rush down to avoid missing the final outgoing bus of the day.

Hungabee Lake and Cathedral Mountain, Opabin Plateau, Yoho National Park, British Columbia
You’ll begin by descending from the high point of the plateau back to Hungabee Lake, via a rocky “staircase,” though you’ll now be on the west side of the lake. If it’s a calm day, the lake reflections will take your breath away. The trail doesn’t skirt all that close to much of the shore, and you’re asked to stay on the trail–to avoid trampling the delicate ground cover–but if you pick your spots carefully you’ll be able to approach the shore by stepping only on some of the many rocks that dot the meadows and Hungabee’s shoreline.

Cascade Lakes and Mt. Hungabee, Opabin Plateau, Yoho National Park, British Columbia
By continuing on the western part of the circuit trail you’ll reach the northwest part of the lake and will begin to regularly see spur trails darting in multiple directions. Take them. All of them. They’ll wind around through small lakes and ponds, countless stands of larch and in and near moraines and scree slopes. With sufficient investigation and exploration of these trails you’ll discover hidden streams, cascades and waterfalls. I spent a total of something like 10 hours over two days in this area last fall and I could have easily spent twice that without ever running out of drop dead gorgeous scenes.
Hungabee Lake Outlet Stream, Opabin Plateau, Yoho National Park, British Columbia
You will almost certainly find yourself doubling back over some, if not all, of these spur trails. Don’t resist the urge to do so. As hard as you may try, it’s nearly impossible to keep looking over your shoulder to see what you might be missing behind you. By taking all of these trails in both directions, it’s really not an issue. And, it’s amazing how different the view can be, from the same spot, depending on what direction you happen to be looking at any given moment.
Cascade Lakes, Opabin Plateau, Yoho National Park, British Columbia

Schaffer Ridge, Opabin Plateau, Yoho National Park, British Columbia

Cascade Lakes Reflections, Opabin Plateau, Yoho National Park, British Columbia
Once you’re able to tear yourself away from this area, continue on the west part of the circuit trail. On your right, you’ll see a spur with a sign noting the Opabin Prospect. Follow the trail for a few minutes until you reach a rocky area; there will be no specific sign designating the spot, but you should catch a glimpse of a tremendous view of the valley to the north–including Lake O’Hara itself. Climb out on the outcropping (be careful–there are no railings of any kind and the drop off from the prospect is hundreds of feet) and prepare yourself for a magnificent vista.

Mary Lake and Lake O’Hara from the Opabin Prospect, Yoho National Park, British Columbia
Return the way you came until you reach the circuit trail again and make a right turn. This is the West Opabin Trail and this is how you’ll descend back to Lake O’Hara. Don’t put the camera gear away, however, as the views from the early part of the steep, rocky descent are exceptional. You’re looking at, generally speaking, the same scenery as from the Opabin Prospect but from an entirely different perspective.

Mary Lake and Cathedral Mountain from the West Opabin Trail, Yoho National Park, British Columbia

Mary Lake, Lake O’Hara and Cathedral Mountain from the West Opabin Trail, Yoho National Park, British Columbia
Despite the views, you are heartily recommended to keep your eyes on the trail during the descent. If you want to admire the vista (and who wouldn’t?), stop and do so. The descent on the West Opabin Trail can be a bit on the treacherous side, particularly if the trail is wet or icy (which it frequently is), so take care. You’ll end up astride Mary Lake (to your left) and will ultimately find yourself on the southwest shore of Lake O’Hara. From here, it’s a short, easy hike back to Le Relais via the Lake O’Hara Circuit trail.
Give yourself a full day to do the Opabin Plateau hike. If you’re as entranced as I am, you’ll almost certainly want to give it two days. Or more.
Considerations Regarding Gear (Photographic and Otherwise)
When you head up to Lake O’Hara, you have to plan to bring everything you’ll need for the entire day with you–and plan to carry it with you, all day long. That statement applies to photographic equipment, provisions and clothing. You can purchase a few things–select food items and bottled water, for instance–at Le Relais, but it’s best to use this option as a fail-safe, not as a primary source.
With regard to photo gear, you’re probably going to want to do as I say, not as I do. On my trips up to Lake O’Hara, I’ve taken a good-sized photo backpack filled with two DSLR camera bodies, 24-70/2.8, 14-24/2.8 and 80-400 lenses. (And, yes, I did use all of these lenses.) I’m also thoroughly equipped with a cable release, tons of memory cards, an extra battery, filters and cleaning supplies. And a tripod. (Always a tripod.) This is very heavy, but I’ve proven to myself that I can handle all this and not be so weighed down as to ruin the O’Hara experience (or wake up the next morning unable to move). Unless you feel 100% certain that you’re going to be able to handle this kind of heavy kit, you’re going to want to lighten the load.
Many photographers find that they can get by with something like a 24-105 or 24-120 lens, one (DSLR) camera body and a lightweight tripod. And that probably will be good for something like 85% to 90% of photo opportunities for most photographers. You will, depending on conditions, almost certainly want a polarizing filter (and graduated neutral density filters if you’re not into compositing and/or HDR) and be sure to add at least one extra battery and take plenty of flash memory. (If you’re using a lightweight, small footprint mirrorless system, you can take a lot more in the way of equipment without weighing yourself down.) The key is to avoid taking so much gear that it impacts your ability to make the hike in the first place.
In the way of provisions, take enough water to keep yourself going. I typically limit myself to one half-liter bottle, but I’m camel-like in my ability to hike long distances with limited water. For all-day purposes, many people find that they want twice this much. For food, I’d normally take a couple of apples and a resealable bag of trail mix, all of which would fit in a side pocket of my pack. Remember, you can always pick up something at the end of the day at Le Relais. A good map of the hiking trails is a nice thing to have as well. (They’re sold at Le Relais, among other places.)
When it comes to clothing, remember that the weather in the mountains is highly variable and can change in a flash. (Consider the utterly unpredicted snow squall that I dealt with on Day 6.) Dress in breathable layers and be prepared for inclement weather. I always keep a collapsible umbrella in my pack, wear waterproof outer garments (including hiking boots) and am prepared for drastic temperature changes. On the first two days that I went to Lake O’Hara this past fall, the temperature was below freezing in the morning and warmed up to nearly 60 F (15 C) in the afternoon. This is not uncommon. Virtually none of the trails in the Lake O’Hara area have any shelter of any kind, so if it starts to rain–and it rains there a lot–you’re going to get extremely wet in a hurry. There are few things more miserable than being out on the trail, soggy and cold, miles away from Le Relais, weighed down by a heavy pack full of equipment. The best thing you can do is be prepared for this not-at-all-unlikely contingency.
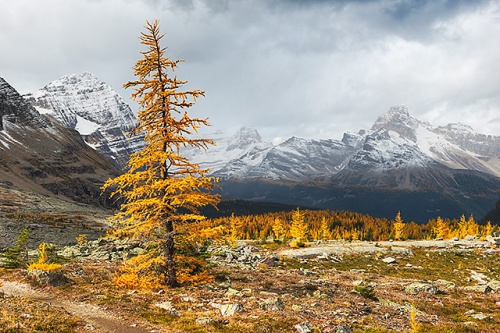
Lone Larch, Opabin Plateau, Yoho National Park, British Columbia
Conclusion
When the conditions are right, the Lake O’Hara area–particularly the Opabin Plateau–is arguably the most beautiful place I’ve ever seen in my life. It’s difficult to gain access to in the first place (just a day or two ago I received e-mail notice from Parks Canada that reservations for 2016–the season doesn’t begin until the latter half of June–would open in January) and weather conditions are often far from optimal. If you’re able to secure access and are lucky enough to get good conditions, you’ll see for yourself what I’m raving about. If you’re properly prepared with equipment, provisions and background information you’ll have an experience you’ll never forget.


Great suggestions. I’ll probably make due with my FZ200 for weight considerations and because I’m not selling or publishing. But I love the shots obtained with more serious equipment especially your shot of the East Opabin Trail, Opabin Plateau.
By: centralohionature on January 11, 2016
at 10:46 am
Thanks!
Yes, a small system–be it an advanced point-and-shoot or a mirrorless kit–would really serve one well in this instance, I think. Just don’t forget the (lightweight) tripod. 🙂
By: kerryl29 on January 11, 2016
at 10:43 pm
Superb information, the photos are amazing…I’ve added this to my “bucket list”; this is such a gorgeous part of the world.
By: Charlie@Seattle Trekker on January 11, 2016
at 4:25 pm
Thanks very much. If you make it to the region, I’m sure you won’t regret having made the trek.
By: kerryl29 on January 11, 2016
at 10:49 pm
First of all, thanks for the shoutout, although I’m sure that any one coming from your blog to mine would be very disappointed.
Then, thank you for all the wonderful information that you have provided, I hope to put it to good use one of these days.
Thank you for the drop dead gorgeous images in this post as well as the others so far, I can’t wait to see the next ones.
Thank you for taking the time to answer my questions, not only in this post, but all the questions I’ve asked over the years, I truly appreciate the time it must take you to do so.
Most of all, thank you for being both a mentor and an inspiration!
By: quietsolopursuits on January 14, 2016
at 2:34 pm
Well, I don’t now what to say other than thanks very much for the extremely kind–and humbling–words. If these posts serve as a point of assistance, in any form, to anyone at all, I’m happy. I’m beyond pleased that you find my postings worthwhile and I’m extremely grateful to you for letting me know.
By: kerryl29 on January 16, 2016
at 11:08 am
Great post! Your pics are beautiful like paintings!!!
By: wildtuscanybushcraft on January 27, 2016
at 3:56 pm
Thanks!
By: kerryl29 on January 27, 2016
at 4:04 pm
The Opabin Plateau cannot be as beatuful as your extraordinary photos
By: Taylor McLeanmm on February 7, 2017
at 6:18 pm
That’s exceptionally kind of you to say; thank you very much.
I assure you, however, that the Opabin Plateau is, in fact, far more beautiful than I’ve been able to demonstrate. When the conditions are right (and, to a degree, even when they aren’t) it remains the most astoundingly gorgeous place I’ve ever seen.
By: kerryl29 on February 7, 2017
at 8:09 pm
[…] Lightscapes Nature Photography blog has a detailed post (with lovely pictures) on hiking the Opabin Plateau trail. It also includes general information on Lake O’Hara’s trails and information on trip […]
By: Hiking Lake O’Hara, Canada | Exploration Vacation on August 8, 2017
at 9:54 am
[…] Smoky Mountains National Park, at Cades Cove and Roaring Fork, among other places. I’ve detailed at great length the significant restrictions on access that Parks Canada has put into place in the Lake […]
By: Thematic Interruption: Loving Places to Death | Lightscapes Nature Photography Blog on August 21, 2017
at 8:03 am
[…] steeply climbing to the plateau itself. I’ve described this hike at great length in a piece posted several years ago and rather than repeat myself I’ll simply direct you there. Suffice to say that, if you […]
By: Favorite Trails for Photography, Part I | Lightscapes Nature Photography Blog on July 30, 2018
at 8:44 am
[…] close to the last minute. (Access to the area is restricted; you can read more about the details here.) As I noted in my post covering the experience, after great anticipation, I was […]
By: Second Chances | Lightscapes Nature Photography Blog on February 11, 2019
at 8:41 am
[…] have discussed my experiences around Lake O’Hara–which serves as the jumping-off point for exploration of the Opabin Plateau, and is a worthy […]
By: The Story Behind the Image: Opabin Plateau | Lightscapes Nature Photography Blog on January 23, 2023
at 8:00 am