Day 11 dawned much as the previous few had–with no signs of fog. With unfinished business to complete in the redwoods and only a few hours left in which to do it–I had a long (approximately 300-mile) drive to make, all the way from Crescent City California to Silverton, Oregon–I headed straight to the Damnation Creek trailhead (again).

Redwoods, Coastal Trail, Del Norte Coast Redwoods State Park, California
My plan was to shoot along the first segment of the Damnation Creek Trail and then head north on the Coastal Trail. I would shoot until hot spots started to appear in the forest, then hike out and begin the 5-6 hour drive to Silverton. I hoped that I would arrive at the jumping off point for Silver Falls State Park by 4 PM or thereabouts.
There was no one in the Damnation Creek parking area when I arrived at the trailhead, just about at first light. There was virtually no wind and it was very quiet in the forest, other than the occasional audible traffic noise from a passing vehicle on the coast highway.

Redwoods, Damnation Creek Trail, Del Norte Coast Redwoods State Park, California
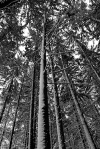
I really felt as though I was reaping the benefits of spending so much time over the past few days in the forest, with a particular emphasis on the several miles of trails–beginning on the Damnation Creek Trail and then heading both north and south from the junction with the Coastal Trail–as I was having an increasingly easier time sorting out visual order in the chaotic woods.

Redwoods, Damnation Creek Trail, Del Norte Coast Redwoods State Park, California
I’ve said before, on a number of occasions on this blog, that–in my opinion–forest photography can be among the most aesthetically challenging sub-genres of landscape photography, principally because of the difficulty of identifying and representing a center of interest that encapsulates an overarching “feeling” of the place.

Redwoods, Coastal Trail, Del Norte Coast Redwoods State Park, California
Over the years I’ve spent a great deal of time photographing in forested settings and there really is no substitute for experience in a specific environment. The wooded areas that I’ve spent so much time wandering in the Midwest of North America are quite different from the redwoods area of northern California, so my previous experience–though not entirely irrelevant–was of limited use. I needed to become more familiar with the specifics of this wooded environment and copious time doing so over several days certainly helped.
As always, I did not eschew opportunities to focus on intimate landscapes.

Forest Floor Intimate, Coastal Trail, Del Norte Coast Redwoods State Park, California
Another advantage to spending a lot of time, day after day in the forest (this was my fifth consecutive day in the redwoods region, with parts of four of them on the trails in Del Norte Coast Redwoods State Park) was that I was familiar enough with the majesty of the place not to be completely awed. Thus, I was able to turn my attention downward on occasion, and take note of the details at my feet.

Forest Floor Intimate, Coastal Trail, Del Norte Coast Redwoods State Park, California
When I lost the light in the forest, I put the additional elements of my plan into effect. Before 10 AM, I was on the road, headed northeast toward Silverton…
I won’t bore you with the details of the drive. Suffice to say that I arrived in Silverton at around 3:30 PM, whereupon I checked into the inn where I had reserved a room. By 4:30 or so I was making my way in the direction of Silver Falls State Park, roughly a 20-minute drive to the east. After arriving, I drove around a bit and surveyed the area, orienting myself in the process. I found a park map and, coupled with research I’d done before the trip, made my way to the South Falls parking area.
Silver Falls State Park is dominated by what is known as “The Trail of Ten Falls,” which effectively circumnavigates the main points of interest in the park–ten waterfalls that lie on two branches of Silver Creek. The two largest and most popular are South Falls and North Falls which lie, appropriately enough, on opposite ends of the park. It’s possible to visit all the waterfalls on a single hike; the Trail of Ten Falls is a nearly 10-mile loop, with lots and lots of up and down. I wouldn’t have nearly enough time to do that on this evening. It was mostly cloudy when I arrived at the park, with no rain in the forecast. The forecast for the next day was cloudy, with a small chance of rain. This was just about perfect, given the subject matter. I had 2-3 hours on this evening, all day the next day and, if needed, part of the following day’s morning for photography. On that third day, I’d have to hustle because I had an early afternoon flight from Portland–a bit more than an hour away–to catch.
It was closing in on 6 PM before I finally made my way down the trail to reach the South Falls area. It came into view from my perch, high up on the bluff, pretty quickly and I was suitably impressed.

South Falls, Silver Falls State Park, Oregon
The trail loops all the way around South Falls, as you can see in the above photograph. I figured that I had the time that evening to shoot at both South Falls, and Lower South Falls, which was about 1.5 miles on the trail downstream. Then, beginning first thing in the morning the next day, I’d start the process of visiting the other waterfalls, beginning with the trailhead near North Falls.
In the meantime, I prepared to photograph South Falls as if I wouldn’t get another chance.

South Falls, Silver Falls State Park, Oregon
I descended from the canyon rim and engaged the trail that circles South Falls at something approaching mid-falls level, then descends near creek level, well below the falls.

South Falls, Silver Falls State Park, Oregon
It’s possible to stay dry behind South Falls but, given the amount of spray, you have to pick your spots.

South Falls Black & White, Silver Falls State Park, Oregon
One interesting perspective allows you to look downstream, through a veritable curtain of water.

Behind South Falls, Silver Falls State Park, Oregon
I spent my time circling South Falls carefully, checking numerous vantage points. I found the perspectives from the left side (as you face the falls) generally more photogenic than the right side, at least partly as a function of the number of trees on the canyon rim; they were more plentiful to the right-hand side, which made for less sky peeking through when photographed from the left.

South Falls, Silver Falls State Park, Oregon
I also switched back and forth, with some regularity, between wide and telephoto lenses, to capture different aspects of the overall scene.

South Falls Black & White, Silver Falls State Park, Oregon

South Falls Black & White, Silver Falls State Park, Oregon
Eventually, as I descended to creek level, I found where the right-hand perspective shines.

South Falls, Silver Falls State Park, Oregon
I saw that there were still a couple of interesting perspectives, but I decided to defer those until after I’d had a go at Lower South Falls. It was getting late. I figured I’d snap up the final few shots I wanted to obtain of South Falls after finishing with Lower South, or–if I ran out of light completely–some time the following day. I hurried down the trail, which was relatively flat most of the way, and within 10 minutes or so I could hear the telltale waterfall noises that I presumed must be Lower South Falls. I was correct. The trail, following a series of long staircases, descended dramatically into the gorge and I soon found myself more or less face-to-face with Lower South Falls.

Lower South Falls, Silver Falls State Park, Oregon
Again, the trail circled behind the waterfall and I felt compelled to examine all of the possible perspectives.

Lower South Falls, Silver Falls State Park, Oregon
The experience was much like that of photographing South Falls, though this waterfall was smaller and the canyon surrounding it was naturally more narrow.

Lower South Falls, Silver Falls State Park, Oregon
In making a few images, I decided to incorporate elements of the trail in my composition, to produce an added sense of perspective.

Lower South Falls, Silver Falls State Park, Oregon
I circled around to the far side of the waterfall and walked a ways up the trail, but it rounded a bend in the canyon in short order and the view of the waterfall was entirely lost. I headed back in the direction I came, but before leaving the immediate area I pulled out the telephoto lens one last time.

Lower South Falls Black & White, Silver Falls State Park, Oregon
I hadn’t completely lost the light so I double-timed it back to South Falls to see if I could obtain the few shots that I’d postponed earlier. There was just enough time to do so.

South Falls, Silver Falls State Park, Oregon

South Falls & Trail Bridge, Silver Falls State Park, Oregon
As I climbed out of the canyon and returned to the now deserted parking area, an end came to another very long day of photography. Almost.
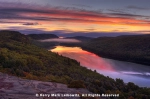
On the drive back to Silverton, over an area of empty pasture, I saw a sliver of sunset, as enough clouds had parted to produce a noteworthy scene. I pulled over to the side of the road and produced one last image, albeit a grab.

Sunset, Marion County, Oregon
And that was that. I knew I had a full day ahead of me tomorrow, given my intent on covering the rest of the Silver Creek waterfalls.


[…] Source: Day 11: From the Redwood Forests to the…Silver Creek Waterfalls? […]
By: Day 11: From the Redwood Forests to the…Silver Creek Waterfalls? | D. Blaine 's Space on September 8, 2015
at 8:55 am
Your photos of South Falls are beautiful. Were the overcast conditions sufficient to enable the slow shutter speed, or did you use a filter?
By: EllenK on September 8, 2015
at 9:27 am
Thanks Ellen. Re shutter speed, I had a polarizing filter in place for all of these shots, which functioned as an approximate two-stop ND filter (in addition to the effect of polarization). That was more than enough to obtain the desired shutter speeds with the possible exception of one or two of the creek shots; I added a three-stop ND filter for at least one of those images. But for the most part, the ambient conditions were plenty dark enough between the overcast skies and the impact of the deep gorge on light levels.
By: kerryl29 on September 8, 2015
at 9:55 am
Amazing virtual tour! Thanks for taking me there – so beautiful nature! Great shots! Bye. Kamila
By: Kamila Pala on September 8, 2015
at 9:38 am
Thanks very much!
By: kerryl29 on September 8, 2015
at 9:55 am
intriguing
By: BLaine Robert Parker on September 8, 2015
at 9:56 am
Thanks!
By: kerryl29 on September 8, 2015
at 9:56 am
Kerry, this is an example of great planning for trails in the state park, they provide safety as well as amazing vistas and your planning has brought out the best in this beautiful scenery. I am so impressed with the viewpoints and the compositions of the redwoods, the forest intimates, the black and white fall abstracts at just the right shutter speed…makes me want to go there.
By: My Heartsong on September 8, 2015
at 10:13 am
Thanks very much, Jane! The places I photographed that day are beautiful and well worth a visit if you ever find yourself in the area.
By: kerryl29 on September 8, 2015
at 10:20 am
Gorgeous set of images, Kerry. I love this part of California– looks like we both had Redwoods on our minds for posts this week. Incredible trees.
By: Jane Lurie on September 8, 2015
at 10:54 am
Thanks very much, Jane. I just checked out your recent post (https://janeluriephotography.wordpress.com/2015/09/07/redwoods-and-aspens/ in case those reading here would like to check it out)–excellent work.
By: kerryl29 on September 8, 2015
at 1:11 pm
That’s very nice of you, Kerry. Thanks and I’m glad you enjoyed it.
By: Jane Lurie on September 8, 2015
at 6:13 pm
Stunning waterfall images! thanks for the tour.
By: Tiny on September 8, 2015
at 12:00 pm
Thanks!
By: kerryl29 on September 8, 2015
at 1:12 pm
I can’t believe that you had the forest or the falls to yourself, or at least nearly so, no matter what time of day it was. You know what places like that would be like in the midwest, wall to wall people.
I have an equipment related question, do you use round screw-in type ND filters, or the square ones that fit in a holder? If you use the square ones, what size do you use? It seems to me that round graduated ND filters would severely limit how you could compose a scene?
Anyway, amazing images yet again, I’m absolutely stunned by the waterfalls in particular.
By: quietsolopursuits on September 8, 2015
at 2:33 pm
Thanks very much for the kind words–they’re always appreciated.
One of the advantages to most of the places I visited on this trip–the far southern Oregon coast and the coastal redwoods area of far northern California–is that they’re hundreds of miles from any major population center–about 300 miles from Portland and closer to 400 miles from San Francisco and the rest of the Bay Area. As a result, my impression is that neither area ever gets super crowded, even on summer weekends (which undoubtedly is the busiest time). I was there “off-season” (i.e. before Memorial Day) and I deliberately minimized the number of weekend days I was on the ground, preferring to use the weekends for travel purposes. I do this whenever possible; it almost always pays off in terms of limiting the number of people who are present at just about any venue. The only weekend time I was in the field on this trip was spent on the coast (and part of one day in the redwoods); I didn’t detect any increase in human presence on the coast on the weekend and there was only a slightly increased number of people in the forest.
As for your question re ND filters, while I own a set of Lee graduated ND filters, I haven’t used them in ages. One of the very first things I did when I converted to digital capture 12 years ago was to learn about and experiment with manual blending techniques in Photoshop, specifically so I could ditch the GNDs. I viewed them as a necessary evil during the film era; I didn’t like carrying the cumbersome apparatus around and I didn’t like using them either. About a year after I started using a digital camera I abandoned them for good. Between blends, years of fine-tuning an HDR technique, and the high dynamic range characteristic of today’s digital sensors I find GNDs completely superfluous. (Somewhat ironically, current digital cameras, with Live View and the ability to zoom in on a scene on the LCD screen probably make them easier to use than ever before.)
Some people still use them of course, and if you’re going to go that route I strongly recommend going with the kit–a holder and set of rectangular filters. As you’ve already noted, the screw-ins are virtually unusable, as I see it, because they more or less require you to put the horizon line in the center of the frame. With the rectangular filters you can move the filter up and down in the holder to better accommodate the desired composition; you can also rotate the filter to better deal with a horizon line that isn’t straight (e.g. mountain slopes, hills, tree-lines, etc.) My filters are 4×6″ for what that’s worth.
I do carry a pair of screw-in solid neutral density filters…a three-stop and a six-stop. In combination with one another and/or a polarizing filter this provides a great deal of flexibility in terms of how much neutral density to add to a given scene.
By: kerryl29 on September 8, 2015
at 3:12 pm
Thank you very much for all your help, again!
I’ve been watching a few online presentations offered by B&H with several big name photographers, like Michael Melford, and they seem evenly split between using software and filters to achieve the desired results. Since I think that your work stacks up well with any of theirs, I wanted your opinion on filters.
I’ve been shooting quite a few sunrises this summer, using my Canon 60D body, and I think that the histograms aren’t as accurate as I thought that they were, and that body doesn’t have as much dynamic range as some of the better bodies. Since I haven’t been post-processing for very long, I was looking for an easy fix to make up for my lack of those skills, which is why I asked about GNDs. I’d probably be better off spending more time refining my computer skills and spend the money that I would spend on filters on other things. Again, thanks for all your help!
By: quietsolopursuits on September 8, 2015
at 11:38 pm
Always happy to help if I can.
Re dynamic range and the 60D…you’re right, the 60D specifically (and Canon bodies generally) don’t have quite the same DR as cameras built around modern Sony sensors (e.g. the Sony a7 line of cameras and most of the Nikon DSLRs). But the DR of your camera is still pretty good…just not quite as good as some other cameras.
On the subject of the histogram…keep in mind that the histogram for the images you review on your camera is technically a rendering based on the embedded JPEG (that’s what you’re looking at when you review images on the camera’s LCD, BTW) for each shot, not the actual RAW file. One way to make that embedded JPEG better resemble the underlying RAW image is to neutralize any “picture styles” that your camera is automatically applying. These can significantly impact the rendering of the histogram. I have no personal experience with the 60D, but a quick Google search pulled up all sorts of hits on the camera’s picture style settings and how they work. If you haven’t already adjusted these settings for your purposes, I’d encourage you to look into it.
Specifically on the subject of digital multiple image blending/HDR vs. GNDs…people who prefer the latter approach have some pretty good arguments to make. The first is the lack of interest in embedding themselves in the drudgery of dealing with advanced post-processing techniques, both the time spent learning these techniques in the first place and then the time spent applying them. The second is an application point…there are absolutely times when a multi-image approach to assembling a shot is less than desirable and typically applies to situations where there are moving objects in the scene. You know how hard it can be, at times, to obtain the look you want with moving objects in a single frame…how do you make that work with multiple frames? It’s a very valid point and speaks to the potential advantage of using filters instead.
On the other hand, as you’ve alluded, there’s no free lunch with the filter approach either. Learning to use GNDs well is not for the faint of heart (though as I mentioned last time, it should be much easier, with today’s “real world time” tools, to learn to use these filters well than ever before). And a good, quality set of GNDs is expensive (and if you’re not going to get a quality set of filters, why bother?). And, of course, you have to haul this gear around with you and be prepared to slip the entire apparatus on and off your lens(es) as needed…and, to use these things with a polarizer, you’d have to invest in a quality rectangular polarizing filter (there’s really no way to make the screw-on polarizing filter work with the holder for the GND)…and be aware of significant potential vignetting issues if you’re using all of this on wide angle lenses.
So there are plenty of pluses and minuses, regardless of which direction you choose to go.
As is the case with just about everything photography-related, my philosophy falls very much in the “whatever works” school of thought. I would never try to talk someone who’s happy with the results he/she is getting with the use of GNDs to do something different, for instance. I’ve simply found that, for me, using a different approach is the best option. The truth is that I’m able to get the results I want–with a single frame and no GND–the vast majority of the time with my current camera (and its reported 14+ stops of DR at base ISO). When I can’t, I resort to HDR, manual blending or some combination of the two. Just to provide a couple of quick examples…
Single frame treatment:
http://www.lightscapesphotography.com/Au_Sable_Pt_2872_-2&-1&0&1&2_de-tc.htm
http://www.lightscapesphotography.com/Kootenay_Plains_2630_-2&-1&0&1&2_de-tc.htm
http://www.lightscapesphotography.com/Bear_Rocks_0786_de-tc_-1&0&1&2.htm
HDR (5 frames) treatment:
http://www.lightscapesphotography.com/Bandon_5157-5161_de-tc.htm
http://www.lightscapesphotography.com/Jasper_1878-1882_Medicine_Lake_de-tc.htm
http://www.lightscapesphotography.com/Grand_Canyon_0883-0887_Cape_Royal_de-tc.htm
Manual Blend of two images:
http://www.lightscapesphotography.com/Highway_11_3000_0&1&2_land_de-tc&2997_-1&0&1&2_sky_de-tc.htm
Manual Blend of two iterations of the same exposure:
http://www.lightscapesphotography.com/Crazy_Hill_1583_-1&0&1_de-tc_wb7000&-0.5_wb5200_blend.htm
For me–and I want to emphasize, again, that reasonable people can disagree on this point–the considerable time spent working to develop and improve digital post-processing techniques has been worthwhile, because it allows me to overcome potential problems in the field that I wouldn’t be able to withstand otherwise, with or without filters. I hasten to add, however, that the two things aren’t mutually exclusive–it’s certainly possible to be adept with the use of GNDs and to have plenty of digital darkroom acumen at one’s behest, and if I really felt as though the filters allowed me to do something that I couldn’t do otherwise, I’d still use them.
Hopefully all of this rambling is of at least some modest value to you. 🙂
By: kerryl29 on September 9, 2015
at 10:02 am
One of the first things that I learned when I began using Lightroom was to turn off all the features and styles that Canon has in the 60D body, I get sharper, clearer images that way. The same holds true with the newer 7D Mk II that I recently purchased, everything in that body is disabled as well. The only difference between the two is that the images from the 60D look better if I have the camera calibration in Lightroom set to Adobe standard, whereas the images from the 7D look better if I use the camera standard setting for camera calibration in Lightroom. I assume that’s because the 7d Mk II was just released, and Adobe hasn’t had time to fine tune Lightroom for that body yet.
When I said that the histogram lies, it’s that it doesn’t show it when a very small part of the image is severely under or over exposed, such as the sun as it pops up over the horizon, or a dark bird against a light background. The histogram in the camera may show no highlights at all, but the histogram in Lightroom shows it clearly, and that the highlights are starting to be blown out. I may have to go back to having the “blinkies” on again, but I find them distracting.
I need more practice as well, I know from experience how to to expose different colored wildlife against various backgrounds, just from having shot so many photos in different lighting. I don’t even use the histogram for wildlife photos any longer.
Yes, all of this is a great deal of help, as is viewing your photos. Every bit of our discussions has helped me a great deal. It may take me a while before I fully understand what you’ve told me, but I’ve had plenty of aha! moments when something you’ve written suddenly make sense.
By: quietsolopursuits on September 9, 2015
at 3:37 pm
Good to hear that you’ve dealt with any potentially interfering picture style settings.
One quick question re the histogram…are you looking at a “luminosity histogram” or a histogram that shows all three color channels separately? The latter is (typically) far more accurate than the former and can help you avoid clipping any of the channels, even when the luminosity histogram implies that you’re fine.
Absolutely, additional experience and testing will help with all of this. Part of that experience is simply knowing the foibles of the presentation itself (e.g. the histogram suggests I have room but I know I don’t because I’ve seen this before). Whenever I’m dealing with a high dynamic range scene I rely on the histogram–usually the RGB histogram–to make sure I haven’t blown any of the highlights, but I do know, after all this time, that I invariably have a hair more room on the right-hand side of the graph (i.e. the highlights) than it appears.
By: kerryl29 on September 9, 2015
at 4:10 pm
Thanks again for the help.
I use all three channels, but mostly it’s learning to translate the information that the camera presents to me into something meaningful to me. In other words, I need more experience. But, I’m learning, and that’s the main thing, and I’m seeing improvements in my images. I still have a way to go, but as long as I’m making progress, I’m happy.
By: quietsolopursuits on September 9, 2015
at 11:20 pm
Sounds to me as though you’re definitely on the right track.
One thing that might help you get where you want to go–there’s a good chance you’re doing this already, but I thought I’d mention it just in case–would be to bracket exposures by, say, 1/3 or 1/2 stop, on those occasions when you think you’re on the edge of blowing the highlights. Not only will it make it a near certainty that you’ll have at least one usable frame for every scene you shoot, it will likely also speed up the translation process you spoke of in your note.
By: kerryl29 on September 10, 2015
at 9:19 am
Sorry, this one almost slipped past me. I never thought of bracketing images shot to be used in Photomatix to create HDR images, but there’s really no reason why that can’t be done, thank you!
By: quietsolopursuits on September 11, 2015
at 11:30 pm
Nice photos as usual! How long was your shutter open for on the second waterfall picture?
By: Israel's Good Name on September 9, 2015
at 7:50 am
Thanks!
Shutter speed for the photo in question was 1/5 sec.
By: kerryl29 on September 9, 2015
at 9:05 am
Gorgeous photos…Love the waterfall shots and the sunset is absolutely stunning.
By: Charlie@Seattle Trekker on September 9, 2015
at 12:23 pm
Thanks very much!
By: kerryl29 on September 9, 2015
at 12:34 pm
You’ve definitely provided motivation for me to do the entire trail. The falls are utterly gorgeous. Maybe I’ll fit it in one of these days. The limp is subsiding, but then Gold Beach is calling. It’s tough having to make choices like that! 😉
By: Gunta on September 9, 2015
at 10:16 pm
Thanks…remember, these are only two of the 10 waterfalls, both of them (relatively) easily accessed from the South Falls area. Images from the other waterfalls (save one–and that will be explained) will appear in the next post. I think you’d find the entire trail well worth the time and effort; I strongly suspect that the best time to visit is more or less when I was there. Water flow is at its best (enough to make even the ephemeral waterfalls, like Winter Falls and Double Falls, run) and there are wildflowers all over the place.
Very glad to hear that you’re on the mend. Hopefully the same can be said for the GB domicile. 🙂
By: kerryl29 on September 9, 2015
at 10:40 pm
[…] had gotten my feet wet–figuratively speaking–at Silver Falls State Park on Day 11, having visited South Falls and Lower South Falls. On Day 12, I arose very early and arrived at […]
By: Day 12: The Trail of Ten Falls | Lightscapes Nature Photography Blog on September 14, 2015
at 8:49 am
[…] https://lightscapesphotography.wordpress.com/2015/09/08/day-11-from-the-redwood-forests-to-the-silve… […]
By: Favorite Trails for Photography, Part I | Lightscapes Nature Photography Blog on July 30, 2018
at 8:44 am